Good & Bad Passport Photo Examples: Visual Guide to What Gets Accepted
See real examples of accepted and rejected passport photos side by side. Learn what makes a good passport photo, the most common mistakes that trigger rejections, and how to get it right the first time.
You’d think taking a passport photo would be hard to mess up. Face forward, click, done. But the State Department rejects thousands of passport photos every year for issues that are completely avoidable — shadows, wrong background, glasses still on, head tilted just a bit too far.
The frustrating part? Most people don’t know their photo is bad until their application bounces back weeks later. That’s weeks of delay because of a shadow on your chin.
This guide shows you exactly what gets accepted and what gets rejected — with visual examples — so you nail it the first time.
What Makes an Accepted Passport Photo
Let’s start with what a good passport photo looks like. The State Department’s requirements are specific, and every accepted photo hits these marks:
| Requirement | Specification |
|---|---|
| Size | 2 × 2 inches (51 × 51 mm) |
| Head height | 1 to 1⅜ inches (25–35 mm) chin to top of head |
| Background | White or off-white, no shadows/texture/lines |
| Recency | Taken within the last 6 months |
| Expression | Neutral, eyes open, mouth closed |
| Glasses | Not allowed (even clear prescription glasses) |
| Lighting | Even, uniform across the entire face |
| Print quality | Matte or glossy photo paper, no pixelation |
For the full size breakdown with exact pixel dimensions for digital submissions, check out our complete US passport photo size guide.
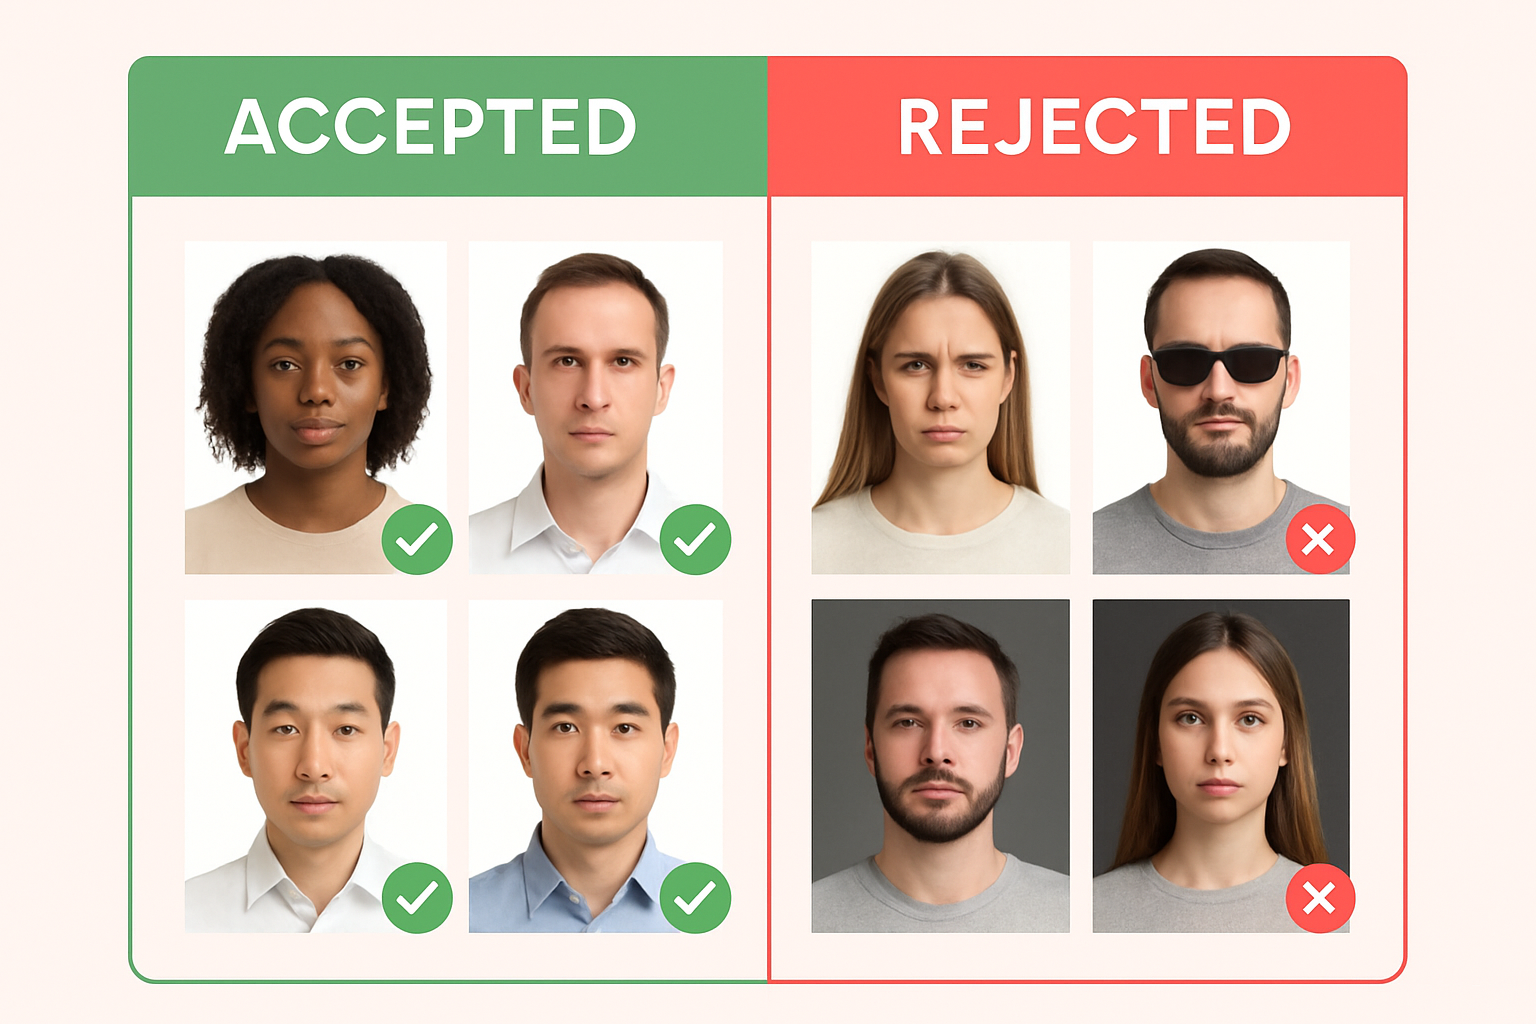
Example: What an Accepted Photo Looks Like
A properly accepted passport photo has:
- Face centered and facing directly forward — no tilt, no turn, no angle
- Both eyes clearly visible and open — even gaze at the camera
- Mouth closed with a neutral expression — a slight natural smile is fine, but no teeth showing
- Even lighting across the entire face — no shadows on the nose, chin, or cheeks
- Clean white background — pure white or off-white with zero patterns, objects, or shadows
- No glasses, headphones, or face coverings — nothing obstructing any part of your face
- Head properly sized — filling about 50-70% of the frame vertically
The key word is recognition. A border agent holding your passport needs to look at the photo and immediately identify you. Everything on the requirements list serves that goal.
Common Rejection Reasons (With Examples)
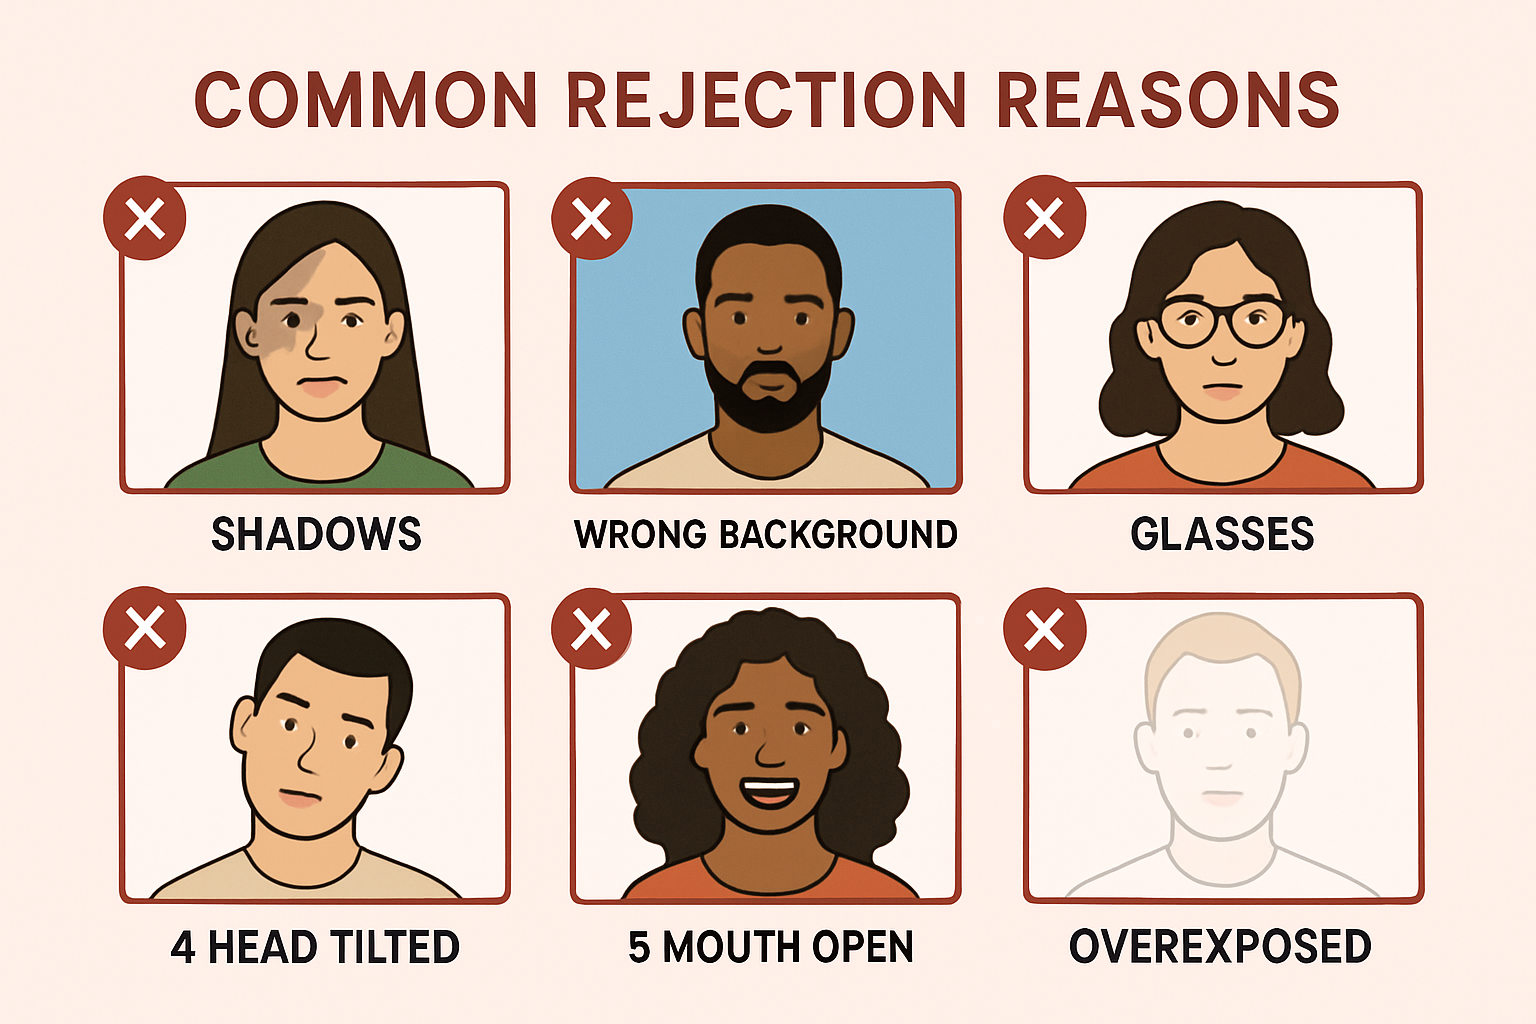
Here’s where people actually run into trouble. Each of these will get your photo rejected — and most of them are easy to fix once you know what to look for.
1. Shadows on Your Face
Why it’s rejected: Shadows obscure facial features. The reviewer can’t confirm your full facial structure if half your face is in shadow.
What it looks like: A dark area across one side of the face, under the nose, or under the chin. Often caused by overhead lighting or a single light source off to one side.
How to fix it:
- Face a window with natural light hitting your face evenly
- Use two light sources (one on each side) to eliminate shadows
- Avoid standing directly under a ceiling light — it casts harsh shadows under your brow, nose, and chin
2. Wrong Background Color
Why it’s rejected: The State Department requires a white or off-white background. Any other color — blue, gray, beige walls, patterned curtains — is an automatic rejection.
What it looks like: A photo taken against a colored wall, a textured surface, or a background with visible objects (furniture, plants, other people).
How to fix it:
- Stand in front of a plain white wall
- Hang a white sheet or poster board behind you
- Or use One Dollar Passport Photo — the app automatically replaces your background with the correct white
For a deep dive on getting the background right, see our passport photo white background guide.
3. Wearing Glasses
Why it’s rejected: As of 2016, the State Department does not allow glasses in passport photos. Not sunglasses, not reading glasses, not clear prescription lenses. None.
What it looks like: Any photo where eyeglasses are visible on the face — even thin wire frames with clear lenses.
How to fix it: Take them off. Simple as that. The only exception is if you cannot remove glasses for medical reasons, and in that case you need a signed doctor’s note submitted with your application.
4. Head Tilt or Angle
Why it’s rejected: Your head must be directly facing the camera — no tilt to either side, no looking up or down, no turning at an angle. Even a slight tilt can trigger rejection because it changes the apparent proportions of your face.
What it looks like: One ear appears larger than the other. The nose appears to point off-center. One shoulder looks higher.
How to fix it:
- Look straight at the camera lens
- Keep your chin level — not tucked down, not lifted up
- Imagine an invisible line from one ear to the other — it should be perfectly horizontal
5. Wrong Expression (Mouth Open, Big Smile)
Why it’s rejected: The requirement is a neutral facial expression with both eyes open and mouth closed. A wide smile — especially one showing teeth — changes the shape of your face and can alter the appearance of your cheeks and eyes.
What it looks like: Grinning, laughing, pursed lips, or any exaggerated expression. Even a subtle open mouth.
How to fix it: Relax your face. A slight, natural, closed-mouth expression is fine. Think “resting pleasant face” — not “say cheese.”
6. Overexposed or Underexposed
Why it’s rejected: If the photo is too bright (washed out) or too dark (muddy), facial features become hard to distinguish. Overexposure blows out skin detail. Underexposure hides features in darkness.
What it looks like: A glowing white face with no visible skin texture (overexposed) or a dark photo where eyes and features blend into shadows (underexposed).
How to fix it:
- Avoid direct flash aimed at your face — it causes blowout
- Don’t take the photo in a dimly lit room
- Natural window light (facing you, not behind you) gives the most even exposure
- Check the photo on your phone screen before submitting — if you can’t see clear detail in your skin, it’s wrong
7. Photo Too Old
Why it’s rejected: Your passport photo must be taken within the last 6 months. If your appearance has changed significantly since the photo, it gets rejected.
What it looks like: You submit a photo from a few years ago where your hairstyle, weight, or facial hair were notably different.
How to fix it: Take a new photo. With One Dollar Passport Photo, it takes 2 minutes on your phone. No reason to dig up an old photo.
8. Low Resolution or Blurry
Why it’s rejected: Blurry, grainy, or pixelated photos don’t show enough facial detail for identification purposes.
What it looks like: Soft focus, visible pixel blocks, or a photo that looks like it was zoomed in from a group shot.
How to fix it:
- Use your phone’s rear camera (higher resolution than the selfie camera)
- Make sure the camera focuses on your face before shooting
- Don’t crop a full-body photo down to just the face — shoot from chest level
Our guide on how to take a passport photo with iPhone covers the exact camera settings and distance for a sharp shot.
9. Wrong Size or Bad Cropping
Why it’s rejected: The photo must be exactly 2 × 2 inches with the head positioned correctly within the frame. Too much headroom, too little headroom, head cut off at the top, or off-center placement all trigger rejections.
What it looks like: Your head is tiny in the frame (too far away), your forehead is cut off (too zoomed in), or you’re shifted to one side.
How to fix it: Let software handle it. Tools like One Dollar Passport Photo automatically crop and size your photo to exact State Department specifications — including the 1 to 1⅜ inch head height requirement.
10. Digital Filters or Alterations
Why it’s rejected: The State Department explicitly prohibits “computer software, phone apps or filters, or artificial intelligence” used to change your appearance. Beauty mode, skin smoothing, face slimming, AI enhancement — all banned.
What it looks like: Unnaturally smooth skin, altered facial proportions, or any visual effect that changes how you actually look.
How to fix it: Turn off all beauty filters and AI enhancement on your phone camera before shooting. Check your camera app settings — many phones enable beauty mode by default.
What to Wear (and What to Avoid)
Your clothing matters more than you’d think:
- ✅ Regular everyday clothing — a solid-colored top works best
- ✅ Religious head coverings — allowed with a signed statement and full face visible
- ❌ Uniforms or camouflage — not allowed, even if it’s your work uniform
- ❌ White tops — technically allowed, but they blend into the white background and look weird
- ❌ Headphones or wireless earbuds — not allowed
For a complete clothing guide, check out what to wear for your passport photo.
Want to make sure your makeup looks right too? Read our guide on wearing makeup in a passport photo.
Quick Self-Check Before You Submit
Run through this checklist before submitting your photo:
- Background: Pure white or off-white, no shadows or patterns
- Lighting: Even across your entire face, no dark spots
- Expression: Neutral, eyes open, mouth closed
- Glasses: Removed (including clear prescription lenses)
- Head position: Straight forward, no tilt, centered in frame
- Recency: Taken within the last 6 months
- Size: 2 × 2 inches, head height 1–1⅜ inches
- Quality: Sharp, clear, no blur or pixelation
- No filters: Beauty mode off, no AI enhancement, no editing
- Attire: No uniform, no camouflage, full face visible
If even one of these is off, fix it before submitting. A rejected photo doesn’t just waste the $1 or $15 you paid — it delays your passport by weeks.
Frequently Asked Questions
Can a slight smile get my passport photo rejected?
A small, natural, closed-mouth smile is generally fine. The State Department says “neutral facial expression,” but they’re not looking for a mugshot. What gets rejected is an open-mouth smile showing teeth, or any exaggerated expression that changes your facial proportions. Keep it subtle and closed-lipped — you’re safe.
My photo was rejected — can I fix it and resubmit without starting over?
Yes. If your passport photo is rejected, the State Department will notify you about the specific issue. You can submit a new photo without restarting your entire application. Take a corrected photo addressing the rejection reason, and resubmit it according to the instructions in the notification.
Do I really have to take off my glasses? I always wear them.
Yes. Since November 2016, the State Department requires all passport photos to be taken without glasses — no exceptions based on preference. The only exception is a documented medical inability to remove them, supported by a signed doctor’s note submitted with your application. This applies to all glasses: prescription, reading, and sunglasses.
What about photos for babies and young children?
Babies and toddlers follow the same basic rules: white background, front-facing, eyes open (though it’s okay if a baby’s eyes aren’t fully open). Lay them on a white sheet to get the background right. No other person should be visible in the frame. The head size requirements are the same — 1 to 1⅜ inches from chin to top of head.
Can I use a selfie for my passport photo?
You can, but be careful. Selfie cameras are lower resolution than rear cameras, and the arm-length distance can create unflattering distortion. If you use a selfie, shoot at arm’s length with good lighting and make sure the image is sharp. Better option: prop your phone up and use the rear camera with a self-timer, or have someone else take the photo.
Get Your Passport Photo Right the First Time
You’ve seen what works and what doesn’t. Now skip the guesswork entirely — take your passport photo with One Dollar Passport Photo. Snap a photo with your phone, and the app handles the white background, exact sizing, head positioning, and compliance check automatically. All for $1.
No pharmacy lines. No guessing if the background is white enough. No finding out weeks later that your head was 2 millimeters too small in the frame.
Ready to create your passport photo?
Get a compliant photo in 2 minutes for just $1. No signup required.