Student ID Photo Requirements: Size & Specifications 2026
US college and university student ID photo requirements. Learn the standard 2×2 inch specs, background rules, and how to take the perfect ID photo at home for under $2.
Quick Answer (TL;DR)
What size are student ID photos? Most US colleges require 2 × 2 inches (51 × 51mm) — same as US passport photos.
Standard requirements:
- Size: 2×2 inch (51×51mm) square format
- Background: Plain white or light grey
- Expression: Neutral (mouth closed) or slight smile (no teeth)
- Glasses: Allowed (no glare on lenses)
- Format: JPEG for digital upload, 600+ DPI
- Cost: $15-25 at campus photo services, $16.99 at Walgreens, $1.35 + $0.99 print = $2.34 at home with OneDollarPassportPhoto.com
Why it matters: Your student ID photo appears on your campus card for 2-4 years — used daily for dining hall access, residence hall entry, gym, library, and student discounts. 20-30% of uploaded photos are rejected for wrong size, bad background, or poor quality.
Standard US College ID Photo Requirements
Technical Specifications
| Requirement | Standard | Why It Matters |
|---|---|---|
| Size | 2 × 2 inches (51 × 51mm) | Wrong size = rejection (most common issue) |
| Background | Plain white or light grey | Busy backgrounds rejected by card offices |
| Expression | Neutral or slight smile | Must look natural and recognizable |
| Head Position | Face camera directly | Tilted or turned head = rejection |
| Photo Age | Within 3-6 months | Must match current appearance |
| Digital Format | JPEG (600+ DPI) | PNG works but JPEG preferred |
| File Size | 100KB-5MB | Too small = pixelated, too large = upload fails |
What Gets Photos Rejected (Top 5)
- Wrong size (30%) — Uploading Instagram photo instead of cropped 2×2 inch format
- Busy background (25%) — Dorm room, outdoor scene, other people visible
- Poor lighting (20%) — Shadows on face, too dark, harsh flash
- Wrong format (15%) — HEIC (iPhone default) instead of JPEG
- Low resolution (10%) — Blurry, pixelated print on ID card
Solution: Use OneDollarPassportPhoto.com — guarantees compliance (200% money-back guarantee = free retake OR refund + $1.35 bonus if rejected).
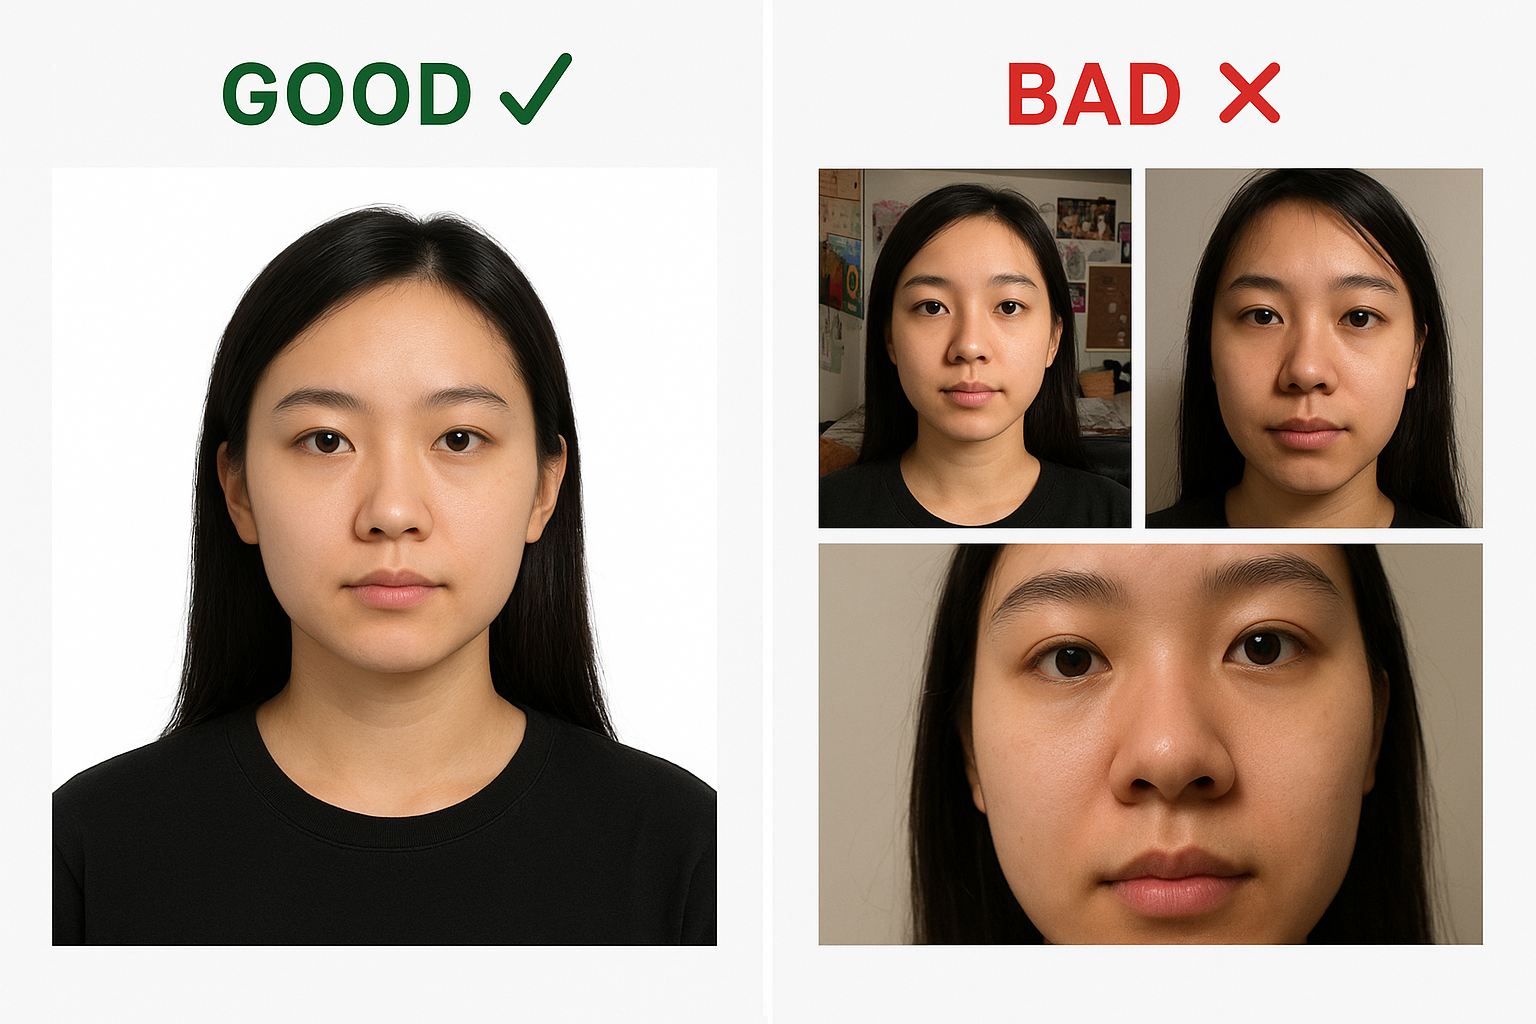 Image: ✅ Good student ID photo (2×2 inch, white background, neutral expression) vs ❌ Bad examples (wrong size, busy background, poor lighting)
How to Take Your Student ID Photo at Home (5 Steps)
Total time: 15-20 minutes
Total cost: $1.35 digital + $0.99 print = $2.34 (vs $15-25 campus photo services)
Step 1: Set Up Your Shot
Background:
- Stand 3-4 feet in front of plain white wall
- OR hang white bedsheet/poster board on door
Lighting:
- Face window (natural light, no direct sunlight)
- Best time: Overcast day OR 1-2 hours after sunrise
- Alternative: Use lamp with white light bulb at 45° angle
Camera:
- Smartphone camera (any iPhone 6+ or Android 8MP+)
- Distance: 3-5 feet from camera to face
- Camera height: Eye level
- Turn OFF portrait mode (no background blur)
Step 2: Choose Your Outfit
✅ Good choices:
- Plain solid-color t-shirt (navy, black, grey, white)
- Sweater or button-down shirt
- Casual or business casual
❌ Avoid:
- Graphic tees with text/logos
- Tank tops (looks like you’re naked from shoulders up)
- Busy patterns (stripes, checks)
Step 3: Pose Correctly
- Face camera directly (don’t turn head left/right)
- Neutral expression, mouth closed
- Eyes open, looking at lens
- Shoulders and upper chest visible
- Relaxed posture (don’t look stiff)
Glasses wearers: Position lighting to avoid glare on lenses
Step 4: Take Multiple Photos
- Take 5-10 photos (gives options if eyes closed, blur, etc.)
- Review each for: sharp focus, no shadows, neutral expression
Step 5: Process with OneDollarPassportPhoto.com
- Go to OneDollarPassportPhoto.com
- Upload your best photo
- Select “US Student ID (2×2 inch)”
- AI crops to exact size, removes background imperfections, adjusts lighting
- Download digital file (JPEG, 600 DPI, $1.35)
- Optional: Download 4×6 print layout (6 photos per sheet)
- Print at CVS/Walgreens/Walmart for $0.39-0.99
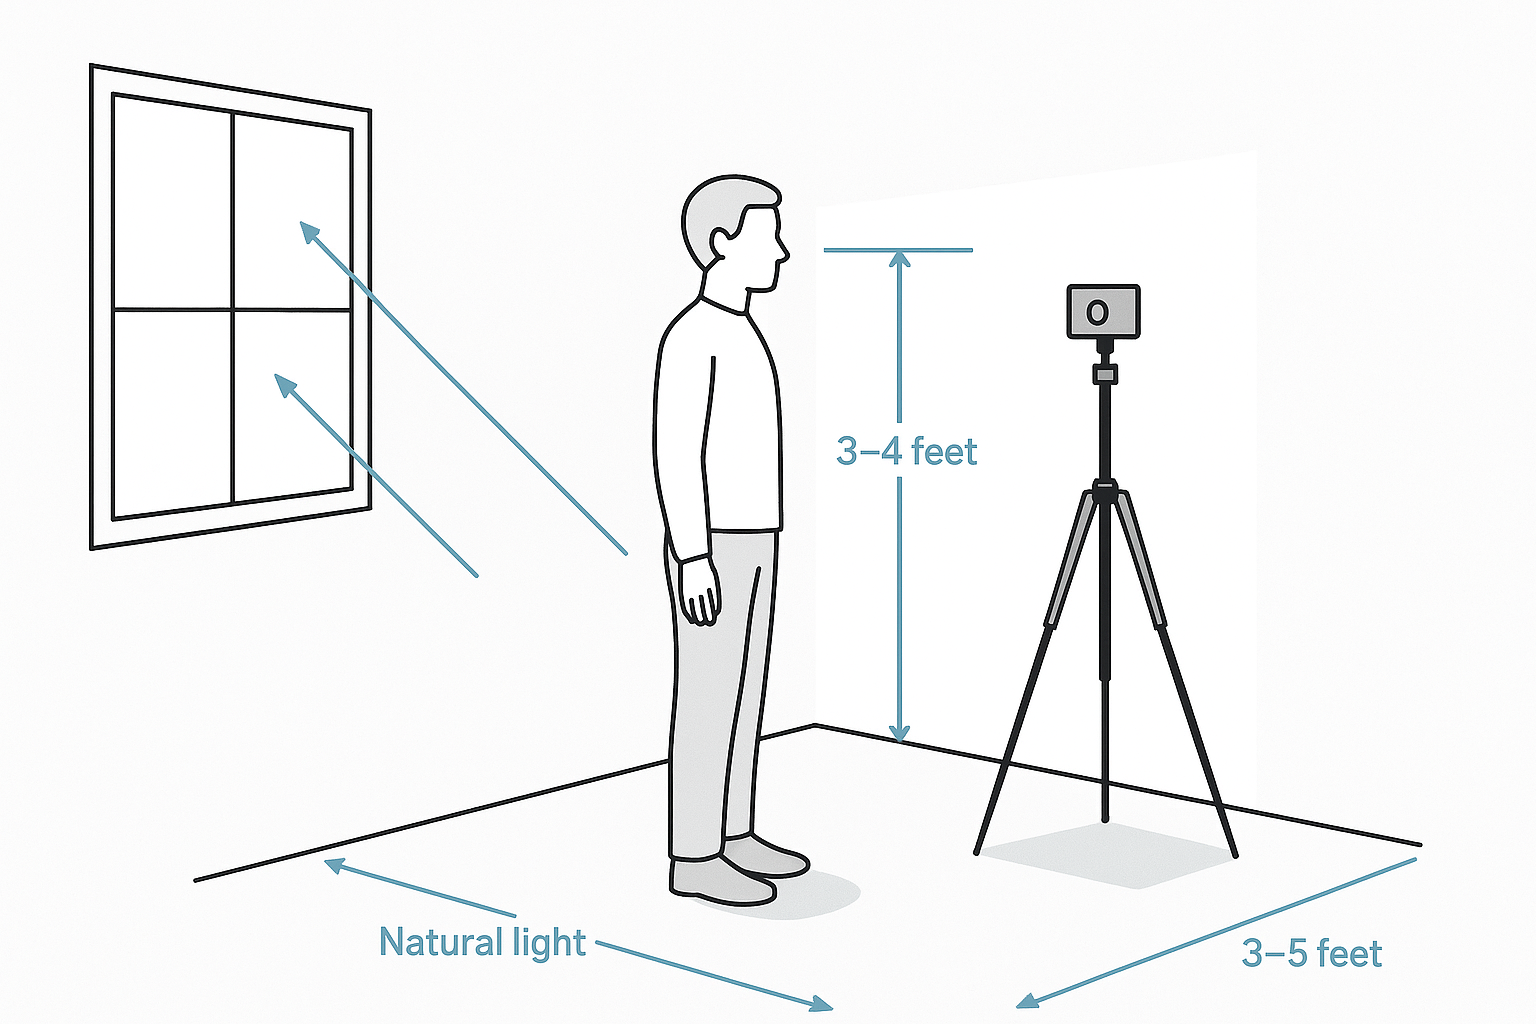 Image: DIY student ID photo setup — camera at eye level, window light at 45°, stand 3-4 feet from white wall
Digital Submission vs Physical Photos
Digital Upload (Most Common)
How it works:
- School sends enrollment link (email or student portal)
- Upload JPEG file (600 DPI, 2×2 inch format)
- School reviews (2-5 business days)
- If approved: ID card printed, pick up at campus card office
- If rejected: Resubmit corrected photo
Pros:
- ✅ Upload from home (no campus visit)
- ✅ Cheaper (use OneDollarPassportPhoto.com $1.35 vs campus $15-25)
Cons:
- ❌ 20-30% rejection rate (wrong specs)
- ❌ 2-5 day wait for review
Tip: Submit photo 2-4 weeks before arrival → ID ready on move-in day → skip 1-2 hour campus card office line.
Physical Photo Submission
How it works:
- Bring 2 printed 2×2 inch photos to campus card office
- Staff verifies photo → ID card printed immediately (5-10 min)
Pros:
- ✅ Instant ID card (pick up same day)
Cons:
- ❌ Must visit campus
- ❌ Campus photo services expensive ($15-25)
Where to Get Student ID Photos (Cost Comparison)
| Location | Cost | Time | Quality | Best For |
|---|---|---|---|---|
| Campus card office | $15-25 | 10-20 min | Good | Guaranteed acceptance, but expensive |
| Walgreens/CVS | $16.99-19.99 | 10-15 min | Good | Professional equipment, but staff may not know student ID specs |
| Walmart | $7.44 | 10-15 min | Good | Cheaper than drugstores |
| DIY + OneDollarPassportPhoto.com | $2.34 | 15-20 min | Excellent | 85-95% cheaper, guaranteed compliance |
Cost breakdown (DIY method):
- OneDollarPassportPhoto.com: $1.35
- 4×6 print at CVS/Walgreens: $0.99
- Total: $2.34 (vs $15-25 campus)
- Savings: 85-95%
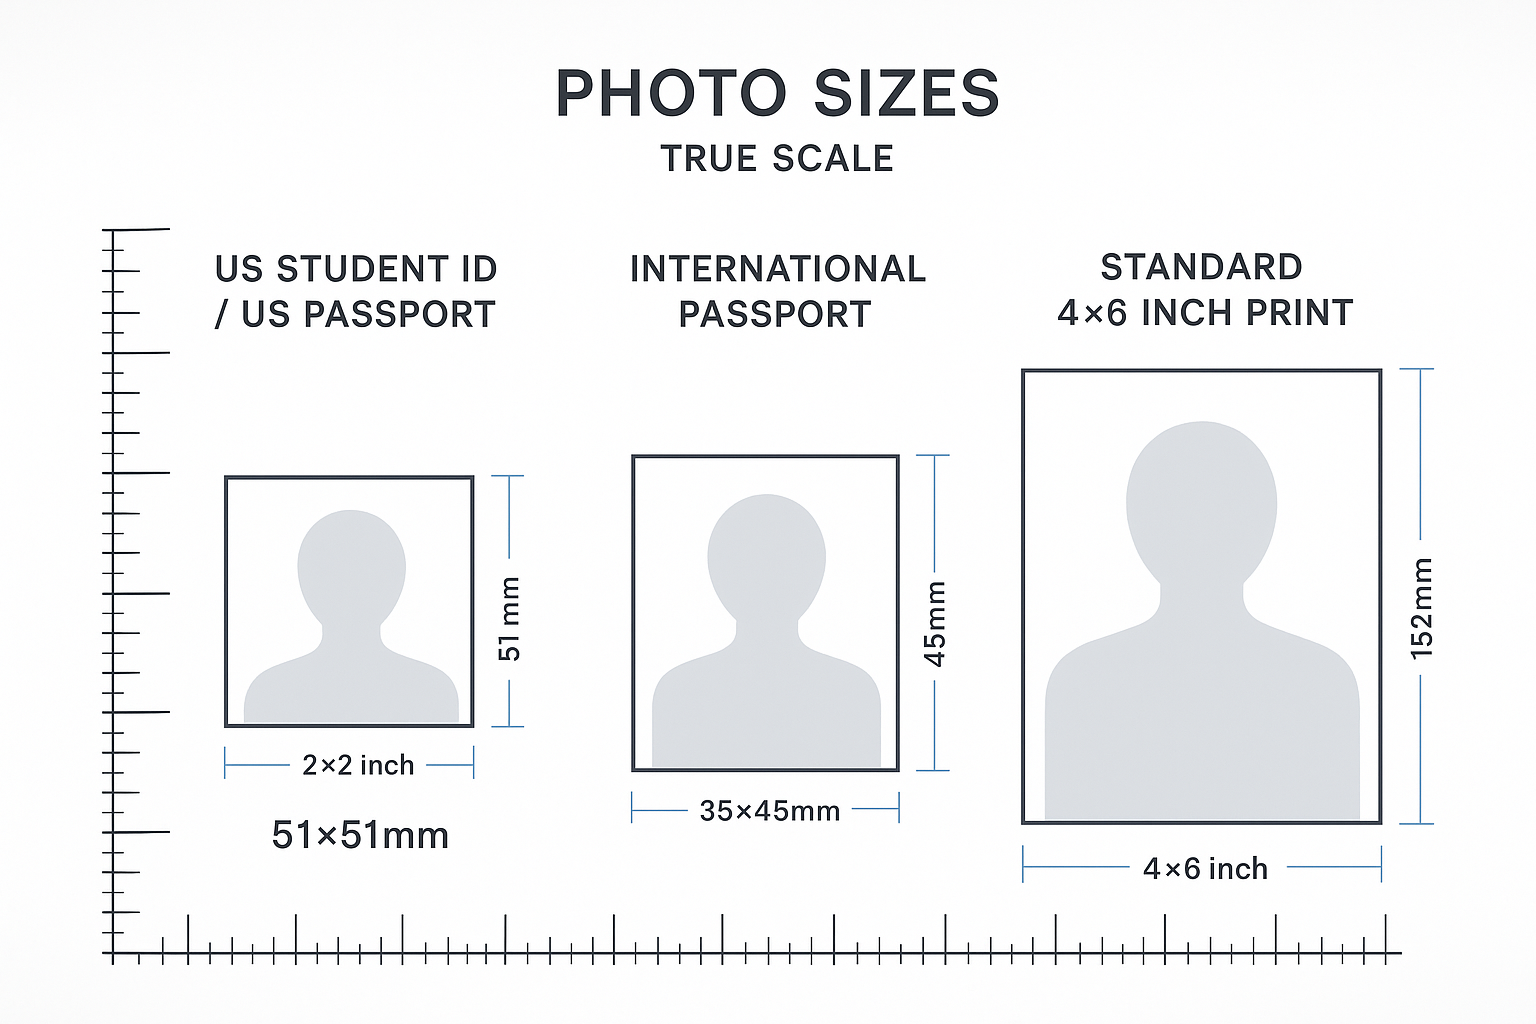 Image: 2×2 inch US student ID size vs 35×45mm passport size vs 4×6 standard print
Variations by Institution Type
US 4-Year Colleges & Universities
Standard: 2×2 inch (51×51mm), white background, neutral expression
Examples:
- Harvard, Stanford, MIT: 2×2 inch, white background
- University of California (UC system): 2×2 inch, passport-style
- University of Michigan: 2×2 inch, light background
Community Colleges
Typical: 2×2 inch OR 35×45mm (passport-style)
More flexible: Some accept passport photos or driver’s license photos if they meet basic quality standards
High Schools
Public schools: Often take photos on Picture Day (no upload needed)
Private schools: May require 2×2 inch or specific school colors for background
International Universities
| Region | Size | Background | Glasses |
|---|---|---|---|
| UK | 35×45mm | Light grey/cream | ❌ Not allowed |
| EU | 35×45mm | White | Varies by country |
| Australia | 35×45mm | Light-colored | ❌ Not allowed |
| China | 1 inch (25×35mm) | White | ✅ Allowed |
| Japan | 30×40mm | Light-colored | ✅ Allowed |
Tool for international students: OneDollarPassportPhoto.com supports 190+ countries — select your university’s country to get compliant photos.
Common Mistakes to Avoid
1. Using old high school photos
- Problem: Outdated appearance (taken 6-12 months ago), wrong format
- Solution: Take new photo within 3 months of enrollment
2. Last-minute selfie in car
- Problem: Blurry, bad angle, outdoor background
- Solution: Plan ahead — take photo at home with proper setup
3. Wrong file format (HEIC)
- Problem: iPhone default format not accepted by most portals
- Solution: Convert to JPEG OR use OneDollarPassportPhoto.com (outputs JPEG automatically)
4. Extreme expression
- Problem: Big smile with teeth showing, making faces
- Solution: Neutral expression or very slight smile (mouth closed)
5. Glasses glare
- Problem: Light reflecting off lenses (eyes not visible)
- Solution: Adjust lighting angle or remove glasses
FAQ
Q: Can I smile in my student ID photo?
A: Most US colleges accept slight smile (mouth closed). Teeth-showing smile usually not accepted. Neutral expression is safest.
Q: Can I wear glasses?
A: Yes at US colleges (no glare required). Not allowed at UK/Australian universities (follow passport rules).
Q: Can I use my passport photo?
A: Yes, if your school accepts 2×2 inch photos (US passport size matches US student ID size). UK/EU passport photos (35×45mm) are wrong size for US colleges.
Q: Can I update my photo after freshman year?
A: Yes. Most schools charge $5-15 update fee. Visit campus card office with new photo.
Q: What if my photo is rejected?
A: Review rejection reason, retake photo addressing issue, resubmit. Unlimited resubmissions at most schools.
Q: Can I wear hijab/turban/religious headwear?
A: Yes. Federal law protects religious expression. Face must be fully visible (hairline to chin).
Checklist: Student ID Photo Submission
6-8 Weeks Before School:
- Check school’s photo requirements (portal login for enrollment link)
- Note size (2×2 inch typical), background (white), submission method
2-3 Weeks Before:
- Take photo at home (smartphone, white wall, window light)
- Process with OneDollarPassportPhoto.com ($1.35)
- Download digital file + optional 4×6 print layout
1 Week Before:
- Upload photo to student portal (JPEG file)
- OR print photos at CVS/Walgreens ($0.99) for physical submission
- Wait 2-5 days for approval
Move-In Day:
- Pick up ID card at campus card office
- OR retake photo on-site if rejected ($15-25)
Total Cost: $1.35 digital + $0.99 print = $2.34 (vs $15-25 campus method)
Create Your Student ID Photo Now: Upload any photo to OneDollarPassportPhoto.com, select “US Student ID,” get print-ready file in 2 minutes. $1.35 digital download. 200% money-back guarantee.
Ready to create your passport photo?
Get a compliant photo in 2 minutes for just $1. No signup required.