Passport Photo Shadows: How to Avoid & Fix Them (With Examples)
Shadows are the #1 reason passport photos get rejected. Learn exactly what causes them, how to set up lighting at home, and how to fix shadow problems fast.
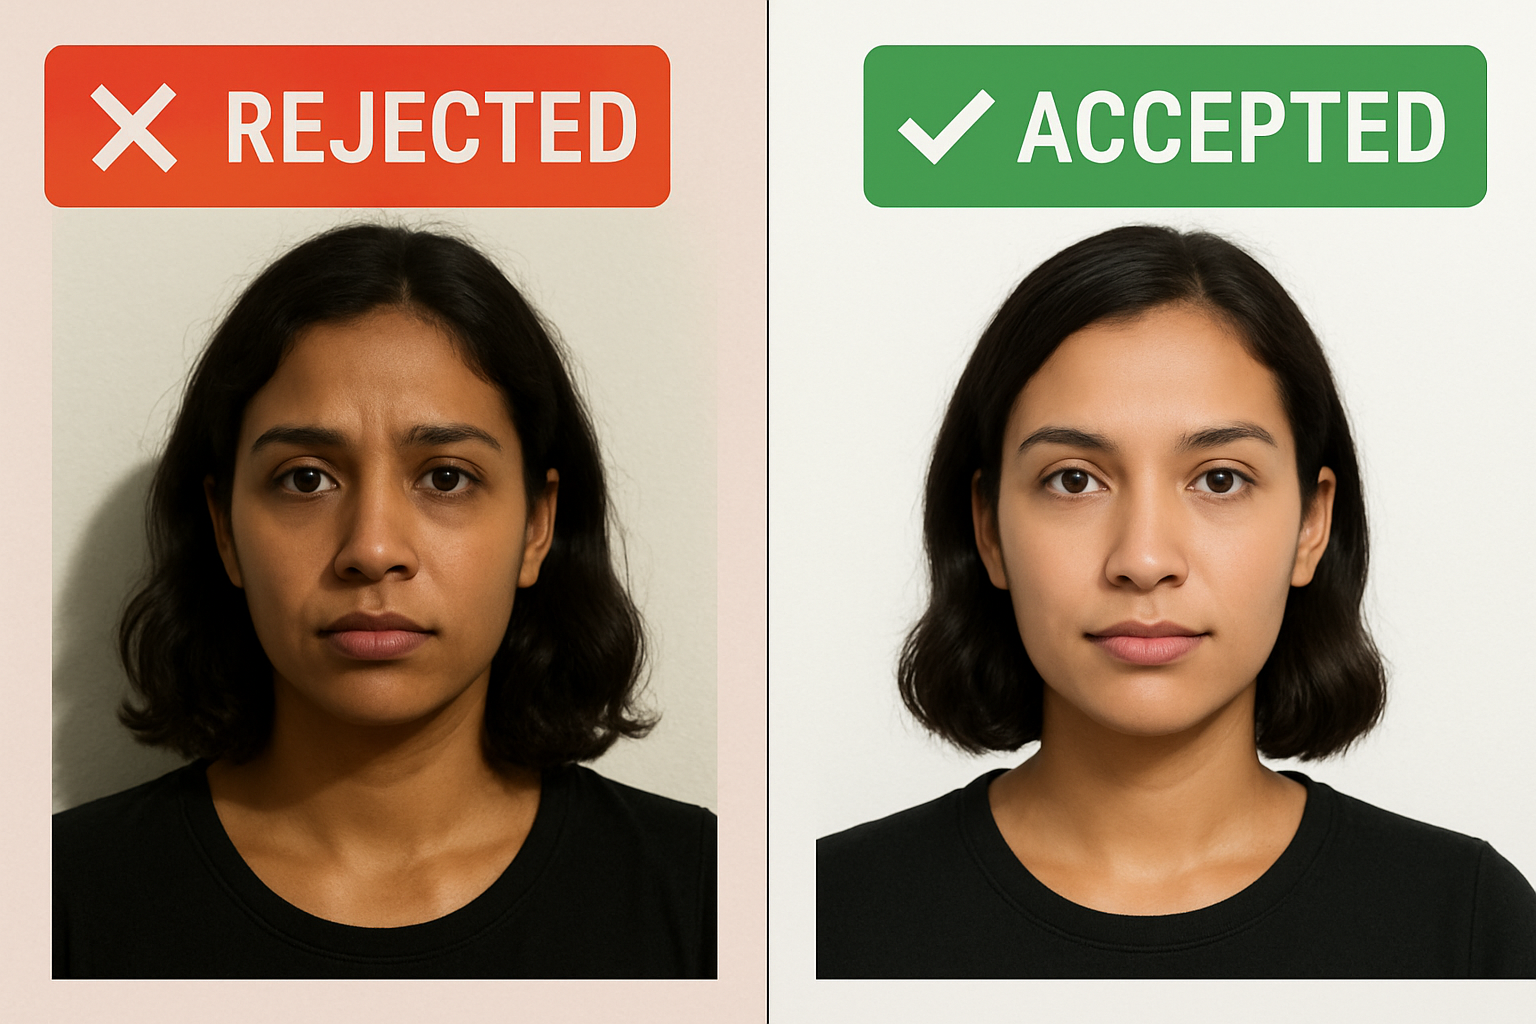
Shadows are the single most common reason passport photos get rejected. Not the wrong size. Not the wrong expression. Shadows.
The US State Department is explicit: your photo must have uniform lighting with no shadows — not on your face, not on the background, not anywhere. One stray shadow from overhead lighting or a lamp behind you, and your application bounces back.
Here’s the good news: shadows are completely avoidable. You don’t need a photography studio or expensive equipment. You need to understand where shadows come from and how to eliminate them.
Why Shadows Get Your Passport Photo Rejected
The State Department’s photo requirements exist for one reason: biometric facial recognition. Border agents and automated systems need to match your face against your photo, and shadows interfere with that process.
Here’s what the official guidelines say:
- Use a white or off-white background without shadows, texture, or lines
- Have uniform lighting on your face
- Overhead lighting or lights too far off to the side can cast shadows on your face, obscuring your facial features
That last point is critical. The State Department specifically calls out overhead lighting and side lighting as problems. Most people take photos under exactly those conditions — a ceiling light or a desk lamp — and wonder why the photo fails.
The 3 Types of Shadows That Cause Rejections
Not all shadows are obvious. Some are subtle enough that you might not notice them on your phone screen but will trigger an automated rejection.
1. Background Shadows
The most visible type. You’re standing too close to a wall, and your body casts a dark outline on the background behind you. Even a faint gray shadow behind your head or shoulders will get flagged.
What it looks like: A dark silhouette or halo shape on the white background behind you.
Why it happens: You’re standing within a few inches of the wall, and the light source is in front of or above you.
2. Face Shadows
Harder to spot but just as problematic. These show up as dark areas under your nose, chin, eye sockets, or along one side of your face. They obscure facial features that border systems need to read.
What it looks like: One side of your face is darker than the other, or there are harsh dark patches under your nose and chin.
Why it happens: The light is coming from one direction — above, from the side, or from a single strong source.
3. Harsh Shadows (High Contrast)
Even if there’s no single dark shadow, hard lighting creates extreme contrast between light and dark areas on your face. This is different from a natural, even range of tones. Harsh shadows have sharp, defined edges and make parts of your face disappear.
What it looks like: Sharp, dark lines at every contour of your face. Your eye sockets look like black holes.
Why it happens: Direct flash, direct sunlight, or a single bare bulb close to your face.
| Shadow Type | Common Cause | Rejection Risk |
|---|---|---|
| Background shadows | Standing too close to wall | High — very visible |
| Face shadows (one side) | Side lighting, window on one side | High — obscures features |
| Under-nose/chin shadows | Overhead ceiling light | Medium — subtle but flagged |
| Harsh contrast shadows | Direct flash or sunlight | High — distorts features |
How to Set Up Lighting for a Shadow-Free Photo
Here’s where people run into trouble. You don’t need professional lights — but you do need to think about where your light is coming from.
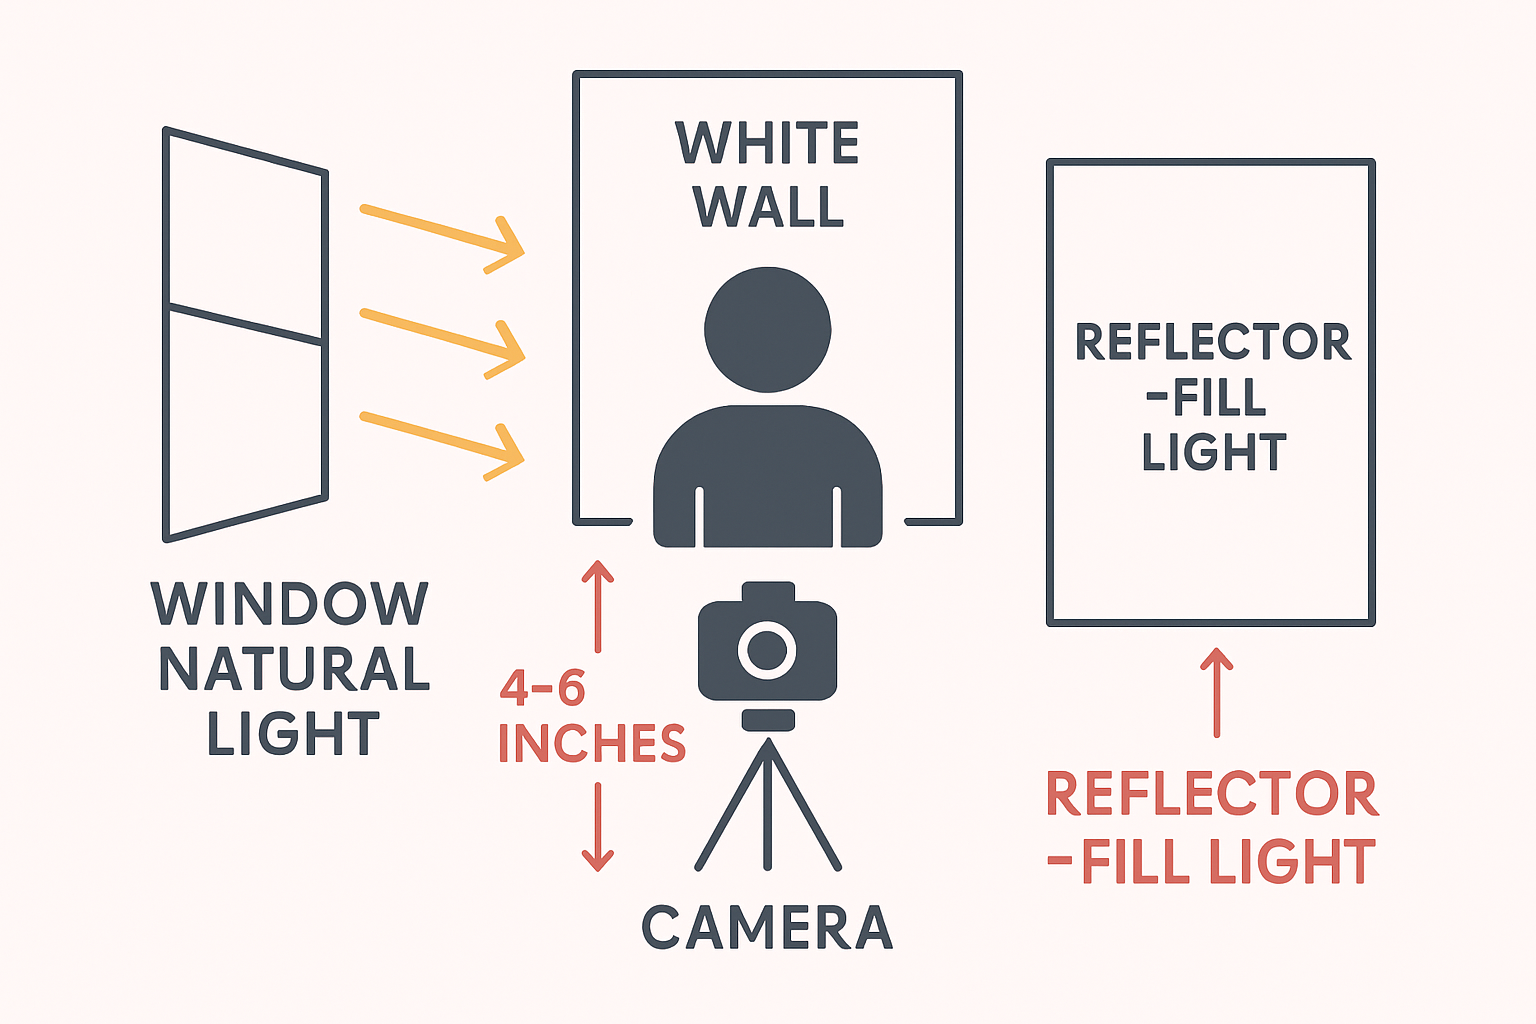
The Ideal Setup (5 Minutes, Zero Cost)
- Find a window with indirect natural light — not direct sunlight streaming in, but bright, diffused daylight. A north-facing window or a window on a cloudy day is perfect.
- Face the window — Your face should point toward the light source. This eliminates one-sided shadows.
- Use a white wall or backdrop behind you — Stand 4–6 inches away from the wall to prevent your body from casting shadows on it.
- Add a reflector on the opposite side — A white poster board, white pillowcase, or even a white piece of paper held to the side of your face opposite the window. This bounces light into the shadow side and evens out your face.
- Turn off all overhead lights and lamps — Mixed light sources (daylight + tungsten bulbs) create color casts and competing shadows.
That’s it. Window light + reflector + white background = shadow-free passport photo.
Natural Light vs. Artificial Light
| Natural Light (Window) | Artificial Light (Lamps/Flash) | |
|---|---|---|
| Shadow quality | Soft, diffused | Often harsh, defined |
| Setup required | Minimal — face a window | Needs diffusion + positioning |
| Color accuracy | Excellent | Can skew warm/cool |
| Best for | Most DIY passport photos | Controlled environments |
| Biggest risk | Direct sun = harsh shadows | Single source = one-sided shadows |
The safe play: Natural light from a window, every time. It’s free, it’s diffused, and it wraps around your face more evenly than any single lamp.
If You Must Use Artificial Light
Sometimes there’s no good window available. Here’s how to make artificial light work:
- Use two light sources — one on each side of your face, at 45-degree angles. This cancels out shadows.
- Diffuse the light — Put a white sheet, pillowcase, or even a white trash bag over the lamp (at a safe distance from the bulb). This softens the light.
- Match the color temperature — Use all the same bulbs (all daylight/5000K or all warm/3000K). Mixing creates weird color patches.
- Avoid overhead lights — Ceiling lights cast downward shadows under your nose, chin, and eye sockets. Turn them off.
Using Your Phone Flash (Correctly)
Most people’s instinct: turn on the flash. Most of the time, that’s the worst thing you can do.
A phone’s front flash is a single, small, harsh light source directly next to the lens. It creates:
- Overexposed skin on your forehead and nose
- Dark shadows behind your head on the wall
- Red-eye or washed-out eyes
- Unnatural, flat lighting
When Flash Is OK
Flash can work if it’s the fill light, not the main light. Meaning:
- Set up near a window with natural light as your primary source
- Turn on the phone’s flash to fill in any remaining shadows
- The flash should supplement, not overpower
On an iPhone, you can also use Portrait mode which adjusts lighting automatically — but make sure to follow the full guide for settings that produce a compliant photo.
When Flash Is Not OK
- As the only light source in a dark room
- At close range (within 2 feet of your face)
- When you’re standing right against a wall (guarantees background shadows)
Fixing Shadows After the Fact
Already took the photo and it has shadows? You have a few options — but be careful. The State Department specifically says: “Do not change your photo using computer software, phone apps or filters, or artificial intelligence.”
That rule targets cosmetic changes — smoothing skin, changing eye color, altering features. Adjusting brightness and shadows is in a gray area, and heavy editing can make a photo look obviously manipulated (which will also get rejected).
Safe Edits
These minor adjustments generally don’t raise flags:
- Brightness/exposure — Slightly increasing overall brightness to reduce shadow intensity
- Shadows slider — Many phone editors have a “shadows” control that lifts dark areas
- White balance — Correcting a color tint
Risky Edits
These can make your photo look unnatural or obviously edited:
- Cloning/patching out specific shadows
- Heavy HDR or tone mapping
- Using AI to “fix” lighting
- Dramatically altering brightness in one area
The Better Option: Retake With Proper Lighting
Honestly? If your photo has noticeable shadows, take it again. It takes 5 minutes to set up proper lighting (window + reflector + white wall) and 30 seconds to snap a new shot. That beats spending an hour trying to Photoshop shadows out and hoping it passes.
Or upload your photo to our tool — it handles background shadows automatically and validates your photo against all State Department requirements before you print.
Create your passport photo now →
Common Shadow Mistakes (And Quick Fixes)
| Mistake | What Happens | Quick Fix |
|---|---|---|
| Standing against the wall | Shadow outline behind your head/body | Step forward 4–6 inches |
| Overhead light only | Dark shadows under nose, chin, eyes | Turn off ceiling light, face a window |
| Side lamp only | One half of face is dark | Add second light or reflector on dark side |
| Direct sunlight | Harsh, defined shadows everywhere | Move to shade or indirect light |
| Phone flash only | Flat face, dark background shadow | Turn off flash, use natural light |
| Backlit (window behind you) | Face is dark, background is bright | Turn around — face the window |
What About Printing at Home?
Even a perfectly lit, shadow-free digital photo can pick up problems at the printing stage. Glossy paper can add glare that looks like a shadow. Low-quality printers can make light areas appear gray. Make sure you’re printing on proper photo paper (matte or glossy) at full resolution.
Also check what to wear in your passport photo — dark clothing against a white background helps create clean contrast without shadows.
FAQ
Can a small shadow on the background get my passport photo rejected?
Yes. Even a subtle shadow visible on the white background can trigger a rejection, especially if you’re submitting digitally where automated systems scan for uniform backgrounds. It doesn’t need to be a dramatic dark shadow — any visible variation from the white background counts.
What’s the best time of day to take a passport photo at home?
Mid-morning to mid-afternoon, when natural light is brightest but not directly hitting you through a window. Overcast days are actually ideal — the clouds act as a giant diffuser, creating soft, even light without harsh shadows. Avoid late afternoon when warm, angled light creates long shadows.
Can I use ring lights for passport photos?
Ring lights can work, but they have a specific downside: they create a distinctive circular reflection in your eyes (called a ring catch light). While this isn’t technically grounds for rejection, it can look unnatural. If you use a ring light, position it behind your camera (not off to the side) and use it at a medium intensity combined with other ambient light. Never use it as your only source.
My ceiling light is the only light source. Can I make it work?
It’s possible but difficult. Ceiling lights cast downward shadows under your nose, eyes, and chin — exactly what the State Department warns about. If it’s truly your only option, stand directly under the light, hold a white piece of paper or foam board at chest level angled upward to bounce light into the shadows under your face, and take the photo from a slightly elevated angle (camera at eye level, not below).
Does One Dollar Passport Photo fix shadow problems?
Our tool automatically removes and replaces your background with a compliant white — which eliminates background shadows completely. For face shadows, the tool validates whether your lighting is uniform enough to pass. If it’s not, you’ll know before you print, not after you’ve mailed your application.
Ready to create your passport photo?
Get a compliant photo in 2 minutes for just $1. No signup required.