Passport Photo Lighting: How to Get Perfect Light at Home (2026)
Learn how to light your passport photo correctly at home. Avoid shadows, get even illumination, and take a photo that won't get rejected.
Bad lighting is one of the top reasons passport photos get rejected. Shadows on your face, uneven illumination, or harsh contrasts can all cause problems.
Here’s how to get perfect lighting for your passport photo at home — no professional equipment needed.
What the State Department Requires
The official requirement is simple:
“Photo should be in focus, with no shadows.”
This means:
- Even illumination across your face
- No shadows under your nose, chin, or eyes
- No shadows on the background
- Not too bright (overexposed) or too dark (underexposed)
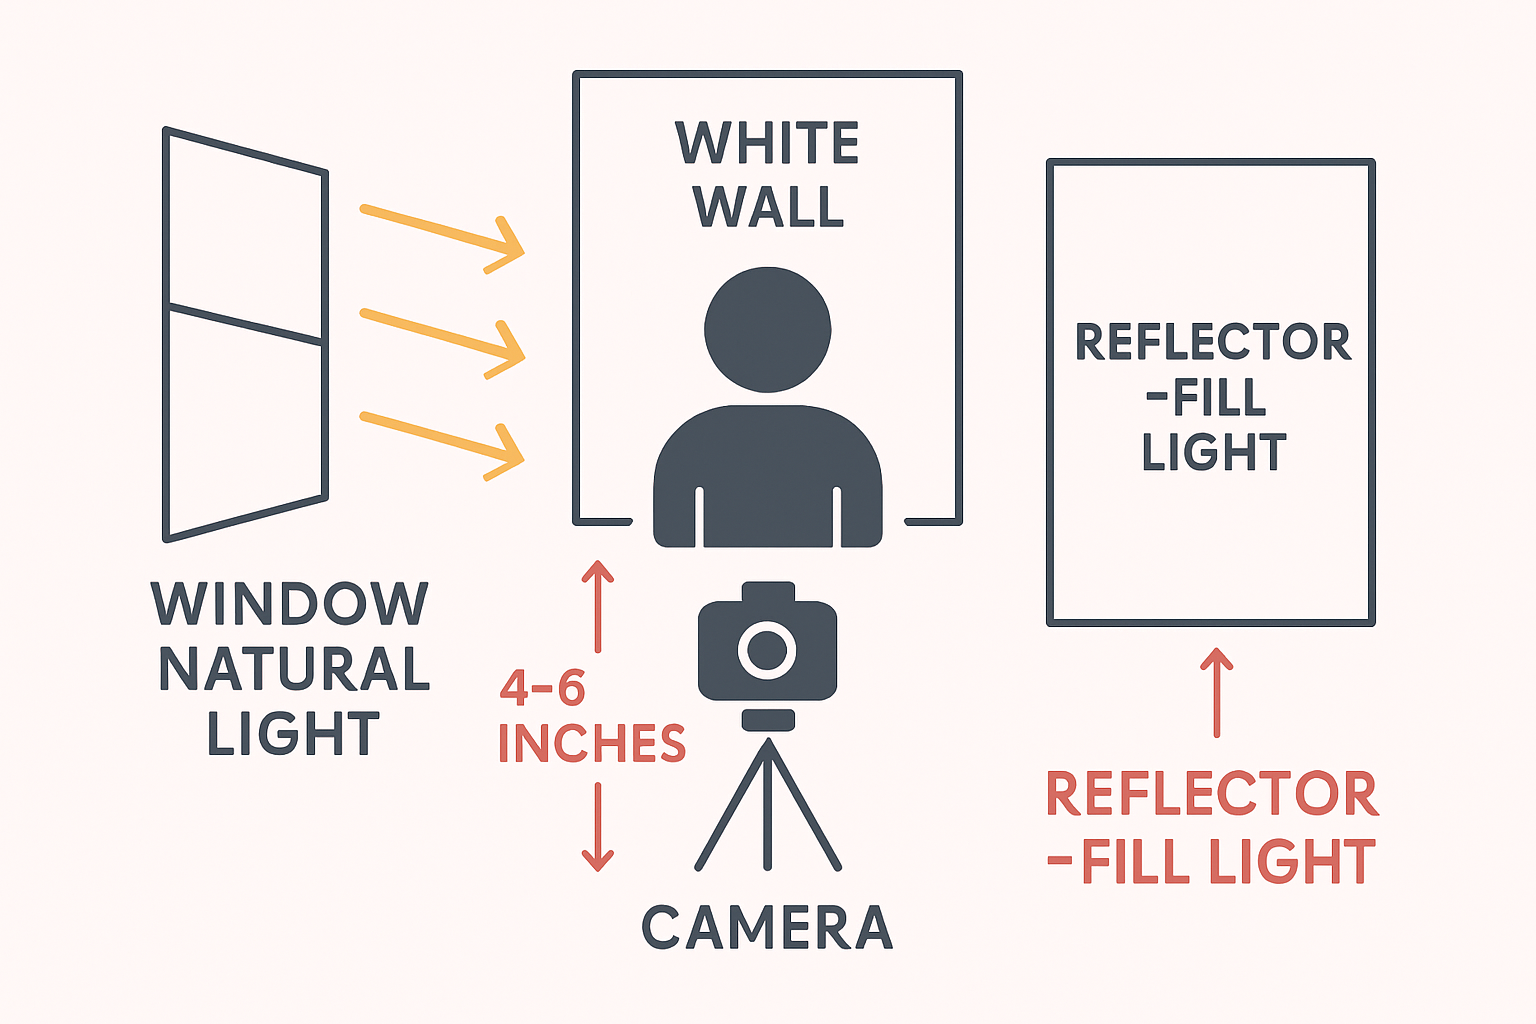
The Best Light Source: A Window
Natural daylight from a window is the best free lighting for passport photos. Here’s how to use it:
Setup
- Find a window that gets indirect sunlight (not direct sun)
- Stand facing the window, about 3-4 feet away
- Position your white background behind you
- Have someone take your photo from in front of you
Time of Day
- Best: Overcast days (soft, even light)
- Good: Morning or late afternoon (softer light)
- Avoid: Midday direct sunlight (harsh shadows)
Window Position
- Face the window directly
- The window should be roughly at your eye level or slightly above
- Avoid having windows to your side (creates shadows on one side of face)
Avoiding Shadows
Shadow Under Nose/Chin
Cause: Light from above Fix: Lower the light source or tilt your chin slightly up
Shadow on One Side of Face
Cause: Light from the side Fix: Face the light source directly
Shadow on Background
Cause: Standing too close to background Fix: Move 2-3 feet away from the wall
Dark Eye Sockets
Cause: Overhead lighting Fix: Add frontal light or use a reflector
If You Don’t Have Good Natural Light
Option 1: Ring Light
A ring light ($20-50) provides even, shadow-free illumination:
- Position it directly in front of you
- Set to daylight color (5000-6000K)
- Medium brightness (not too harsh)
Option 2: Two Lamps
Use two identical lamps on either side:
- Position at 45-degree angles
- Same height as your face
- Equal distance and brightness
Option 3: Bounce Flash
If using a camera with flash:
- Point flash at ceiling (bounce)
- Or use a white card to bounce light forward
- Never use direct flash (causes harsh shadows and red-eye)
The DIY Reflector Trick
A simple white poster board or foam board can fill in shadows:
- Position your main light source (window/lamp)
- Hold the white board on the opposite side of your face
- It bounces light back, filling in shadows
- Have someone hold it or prop it up
Common Lighting Mistakes
Mistake 1: Overhead Room Light Only
Standard ceiling lights create shadows under your eyes, nose, and chin. Always add frontal light.
Mistake 2: Direct Sunlight
Sunlight through a window can be too harsh, creating strong shadows. Use indirect daylight or diffuse with a sheer curtain.
Mistake 3: Mixed Light Sources
Combining daylight with warm indoor lights creates color casts. Use one type of light only.
Mistake 4: Colored Walls Nearby
Light bouncing off colored walls can tint your photo. Work in a room with white or neutral walls.
Mistake 5: Standing Against the Background
Being too close to the wall means your body casts a shadow on it. Step forward 2-3 feet.
Checking Your Lighting
Before taking your final photo, check:
- Both sides of your face are equally lit
- No shadow under your nose
- No shadow under your chin
- No shadow on the background
- Eyes are well-lit (not dark sockets)
- Skin tones look natural (not yellow or blue)
Phone Camera Tips for Lighting
If using your smartphone:
Turn Off Flash
Phone flash creates harsh shadows and red-eye. Use natural light instead.
Disable HDR
HDR can create unnatural-looking photos with weird shadows.
Lock Exposure
Tap on your face on the screen to lock exposure. This prevents the camera from adjusting based on the bright background.
Use Portrait Mode Carefully
Some portrait modes add artificial lighting effects. Use regular photo mode for passport photos.
After Taking the Photo
Even with good lighting, One Dollar Passport Photo can help:
- Adjusts brightness and contrast
- Removes minor shadow issues
- Ensures even illumination
- Replaces background to pure white
Frequently Asked Questions
What’s the best lighting for passport photos?
Natural daylight from a window is best. Stand facing the window with the light hitting your face evenly from the front. Avoid direct sunlight which creates harsh shadows.
Can I use flash for passport photos?
Direct flash is not recommended as it creates harsh shadows and can cause red-eye. If you must use flash, bounce it off a ceiling or white surface for softer light.
How do I avoid shadows in passport photos?
Face your light source directly, stand 2-3 feet away from the background, and ensure light comes from in front of you (not above or to the side). Use a white reflector to fill in any remaining shadows.
Is ring light good for passport photos?
Yes, ring lights provide even, shadow-free illumination ideal for passport photos. Set it to daylight color temperature (5000-6000K) and position it directly in front of you.
Why does my passport photo look yellow?
This usually means your light source is too warm (incandescent bulbs). Use daylight-balanced light or natural window light. Avoid mixing different types of lights.
Get Perfectly Lit Passport Photos
Even if your lighting isn’t perfect, One Dollar Passport Photo can help correct minor issues. Upload your photo and the tool will optimize brightness, contrast, and background.
Ready to create your passport photo?
Get a compliant photo in 2 minutes for just $1. No signup required.