How to Take a Passport Photo on Android: Step-by-Step Guide (2026)
Take a compliant US passport photo with your Android phone in minutes. Samsung, Pixel, OnePlus — camera settings, lighting tips, and the $1 processing trick.
Your Android phone has a camera that rivals professional setups from a few years ago. No reason to pay $15+ at CVS when you can take a fully compliant US passport photo at home in about five minutes.
Here’s exactly how to do it — whether you’re using a Samsung Galaxy, Google Pixel, OnePlus, or any other Android device.
What You’ll Need
- An Android phone (any model from the last 4-5 years)
- A plain white or off-white wall
- Natural lighting (a window during the day)
- A friend to take the photo — or a tripod/phone stand
That’s it. No ring light, no backdrop kit, no studio.
US Passport Photo Requirements (Quick Reference)
Before you start shooting, know the rules. The State Department is strict about these:
| Requirement | Specification |
|---|---|
| Size | 2×2 inches (51×51 mm) |
| Head height | 1–1⅜ inches (25–35 mm) |
| Background | Plain white or off-white |
| Recency | Taken within last 6 months |
| Expression | Neutral, mouth closed |
| Glasses | Not allowed (since 2016) |
| Format | Color photo, full face, front view |
For a deeper breakdown, check out our complete US passport photo size guide.
Step 1: Set Up Your Background
The State Department requires a plain white or off-white background with no patterns, no shadows, and no visible objects.
Your best options:
- A blank white wall (check for nail holes and scuff marks)
- A white door
- A white bedsheet hung flat and taut
- A large piece of white posterboard taped to the wall
Stand at least 2 feet in front of the background. This creates natural separation and prevents your shadow from landing on the wall.
Need more help getting the background right? We wrote a whole guide on getting a white background for passport photos.
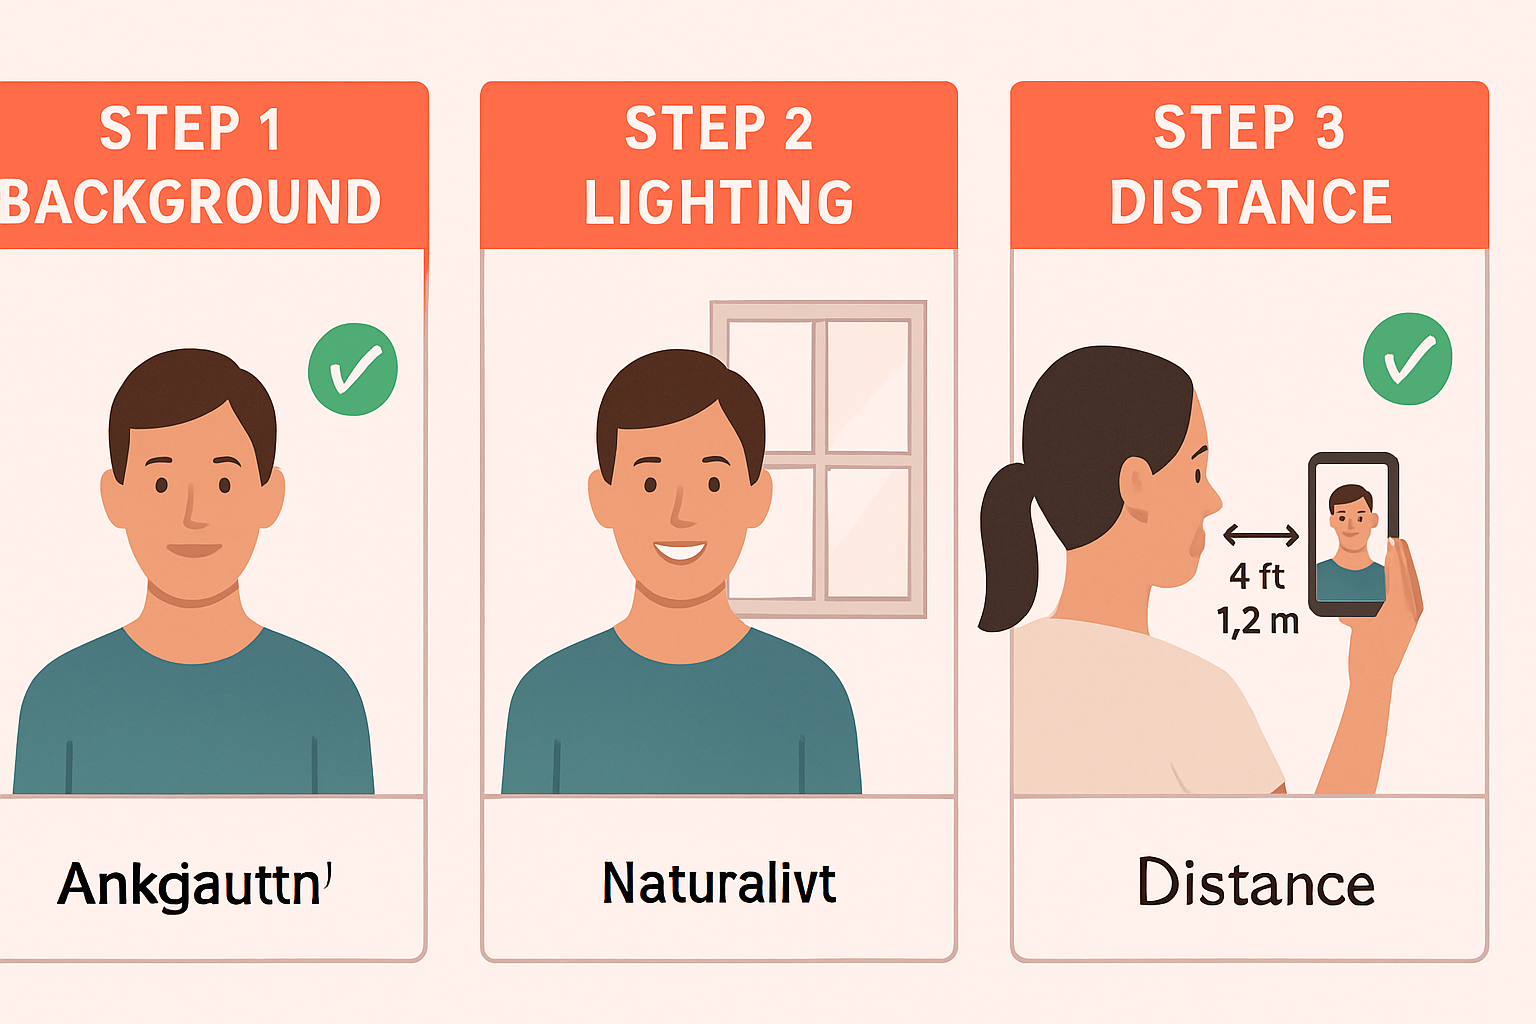
Step 2: Nail the Lighting
Lighting makes or breaks your passport photo. Shadows on your face or background = instant rejection.
The golden setup:
- Face a large window with natural daylight
- Position yourself so the light hits your face evenly — both sides equally lit
- Avoid direct sunlight (harsh shadows). Overcast days or indirect light are ideal
- Turn off overhead lights if they create shadows under your eyes or nose
What to avoid:
- Standing with a window behind you (creates a silhouette)
- Using your phone’s flash (uneven lighting, red eye)
- Fluorescent lighting (casts a green/yellow tint)
The sweet spot: a room with a large window on an overcast day, facing the window, white wall behind you. Perfect even lighting every time.
Step 3: Camera Settings by Phone Brand
Here’s where Android gives you an edge — tons of camera control. But you need to use the right settings.
Samsung Galaxy (S24, S25, A-series)
- Open the Camera app
- Switch to Photo mode (not Portrait)
- Tap the aspect ratio icon and select 3:4 or Full
- Turn OFF Beauty Mode / Face Smoothing (Settings → Selfie → turn off all face corrections)
- Tap the flash icon to set it to OFF
- Use the rear camera — always sharper than the selfie cam
- If shooting solo, use the timer (3 or 10 seconds)
Important: Samsung’s beauty filters are on by default on many models. The State Department will reject photos with visible digital alteration. Go into camera settings and disable every smoothing/enhancement feature.
Google Pixel (8, 9, Pro)
- Open Pixel Camera
- Use Camera mode (not Portrait — it blurs the background, which is fine but unnecessary)
- Tap the down arrow at the top to access settings
- Set Flash to OFF
- Use the rear camera
- Pixel’s HDR+ will automatically balance the exposure — that’s fine
- Don’t use Magic Eraser or any post-processing AI tools
Pixel phones are excellent for passport photos because their processing is natural-looking and doesn’t over-smooth skin.
OnePlus / Other Android Phones
- Open your camera app
- Switch to standard Photo mode
- Disable any beauty, filter, or AI enhancement features
- Flash OFF
- Use the rear camera
- Use a 3:4 aspect ratio if available
Universal Android Tips
- Always use the rear camera. It has a better sensor, better lens, and sharper output. The selfie camera adds distortion at close range.
- Turn OFF Portrait/Bokeh mode. It artificially blurs the background. While our tool handles background replacement, a clean original photo gives the best result.
- Disable ALL beauty filters. This is the number one mistake Android users make. Check Settings → Camera → Selfie options.
- Don’t zoom in. Use 1x (standard lens). Zooming reduces quality.
Step 4: Frame and Shoot
Have your friend stand 4–6 feet away and hold the phone at your eye level. If you’re using a tripod, set it to the same height.
Framing checklist:
- Head and shoulders visible (crop from mid-chest up)
- Head centered in the frame
- Eyes looking directly at the camera lens
- Neutral expression — mouth closed, no smile or very slight smile
- Both ears visible if possible
- No hair covering your forehead or eyes
Take at least 5-10 shots. Slight differences in expression, eye position, or angle matter. More options means a better final pick.
Shooting solo? Use your phone’s built-in timer:
- Set up a tripod or lean the phone against something stable
- Open Camera → tap the timer icon → set to 10 seconds
- Hit the shutter button, walk into position, look at the lens
- Take several rounds
Step 5: Pick Your Best Shot
Review your photos and look for:
- ✅ Both eyes open and clearly visible
- ✅ No shadows on face or background
- ✅ Sharp focus (zoom in to check)
- ✅ Neutral expression
- ✅ Head straight, not tilted
- ❌ Blurry or soft focus — retake
- ❌ One eye squinting — retake
- ❌ Shadow under nose or chin — fix your lighting
Step 6: Process with One Dollar Passport Photo
This is the easy part. Your Android phone took a great raw photo — now you need it cropped, sized, and validated to meet State Department specs.
- Open onedollarpassportphoto.com on your Android browser (Chrome works great)
- Tap Get Started and select United States → Passport
- Upload your photo directly from your gallery
- Our AI automatically:
- Removes and replaces the background with compliant white
- Crops to exact 2×2 inch dimensions
- Validates head size, eye position, and centering
- Checks for common rejection issues
- Preview your photo for free — make sure it looks right
- Download for just $1
Everything processes on your device. We never store or see your photo.
The whole process takes about 30 seconds. Compare that to driving to CVS, waiting in line, and paying $16.99 for the same result.
Create Your Passport Photo Now →
Common Mistakes That Get Photos Rejected
Avoid these — they’re the most frequent reasons the State Department bounces passport photos:
| Mistake | Why It Fails | Fix |
|---|---|---|
| Beauty filters on | Counts as “digitally altered” | Disable all filters before shooting |
| Selfie camera | Distortion + lower quality | Use rear camera with a friend or timer |
| Flash used | Uneven lighting, red eye, glare | Use natural window light only |
| Shadows on background | Background must be uniformly white | Stand 2+ feet from the wall |
| Glasses worn | Banned since November 2016 | Remove all glasses |
| Smiling too much | Must be neutral expression | Relax your face, close your mouth |
| Portrait mode | Can blur background unevenly | Use standard Photo mode |
Samsung vs. Pixel: Which Takes Better Passport Photos?
Both are excellent. But there are differences worth knowing:
| Feature | Samsung Galaxy | Google Pixel |
|---|---|---|
| Color accuracy | Slightly saturated | Very true-to-life |
| Default beauty filters | Often ON by default | Minimal/OFF |
| HDR processing | Aggressive | Natural |
| Best for passport photos | Great once filters disabled | Great out of the box |
| Gotcha | Check beauty mode is OFF | Don’t use Magic Eraser |
Bottom line: Pixel phones need less fiddling. Samsung phones take equally good photos once you turn off the beauty features. Any modern Android phone from the last 3-4 years will work perfectly.
Can You Use the Selfie Camera?
Technically yes, but don’t. Here’s why:
- Front cameras have a wider-angle lens that distorts facial proportions at close range
- Lower megapixel count on most Android phones
- Beauty filters often activate automatically on the front camera
- The State Department requires the photo to “accurately represent your appearance”
Use the rear camera with a friend or a timer. The quality difference is significant.
After You Get Your Photo
Once you’ve downloaded your processed photo from One Dollar Passport Photo, you can:
- Print at home on 4×6 glossy photo paper (our tool gives you a print-ready layout). See our guide to printing passport photos at home
- Print at a drugstore — upload to Walgreens or CVS photo kiosk for about $0.35
- Submit digitally — if renewing online, upload directly to the State Department’s website
FAQ
Can I use any Android phone for a passport photo?
Yes. Any Android phone from the last 4-5 years has a camera that’s more than capable. You need at least 2 megapixels (every modern phone has 12+ MP). Samsung, Pixel, OnePlus, Motorola, Xiaomi — all work fine.
Do I need to download a special passport photo app?
No app needed. Take the photo with your default camera app, then use onedollarpassportphoto.com in your browser to process it. No installation, no permissions, no subscription. Just $1.
Why can’t I use Portrait mode?
Portrait mode artificially blurs the background using depth estimation. While the State Department doesn’t explicitly ban it, the uneven blur can look unnatural and flag your photo for review. Standard Photo mode is the safe play.
Is it really accepted by the State Department?
Yes. Our tool follows the exact specifications published by the US State Department — 2×2 inches, correct head size ratio, white background, proper centering. Thousands of users have successfully submitted photos made with our tool.
What if my wall isn’t perfectly white?
Don’t stress about it. Take the best photo you can with the most even lighting possible. Our AI background removal tool replaces whatever’s behind you with a compliant white background. That said, a closer-to-white original makes for a cleaner cutout.
Ready to take your passport photo? Grab your Android phone, find a white wall, and you’re five minutes away from a compliant photo. Get started for $1 →
Already have an iPhone instead? Check out our iPhone passport photo guide.
Ready to create your passport photo?
Get a compliant photo in 2 minutes for just $1. No signup required.